It is possible to use one PlayStation Vita with more than one PlayStation Network account. And despite what others are saying, it’s not that difficult to switch between two or more accounts. Really! Importers have been on the fence after early reports, so this article should ease their minds a bit. Also some people like to Earn Free PSN Gift Card.
Earlier this month Sony went back and forth on how the Vita works with PSN accounts. They ended the discussion by saying that the system is locked to one PSN Account, and that’s right.
When you set up the system, the account you use is tied to the hardware. You’ll have to go through a process to break that tie and set up a new account.
We’re going to take you through how it’s done. The process looks a bit scary as you go through, but we’ve tried it ourselves a few times.
If done correctly, you won’t lose any of your saves or data, and your system activations will be in line.
How to switch PSN accounts on the PS Vita
1. Backup
Assuming that you’ve already set up your Vita with one PSN account, and that you’re wanting to use another, you’ll want to back up your game data and saves first.
I was particularly nervous the first time I tried this, as I had game saves for several Vita games stored in the system.
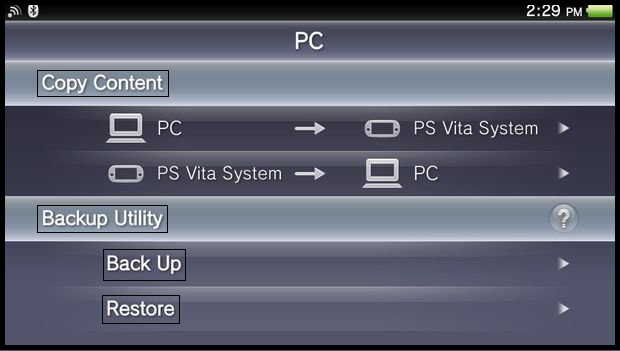
The backup process is very easy, though. Simply connect the Vita to a PC or PS3 and use the Content Manager app. You’ll need Sony’s software for PC use. “Backup” is one of the four options given in this app.
Select this to dump the entire contents of your memory to the connected device. You’ll be able to restore this with one touch through the same app later.
If you don’t need a full system backup, you can choose to simply export your game saves.

2. Restore and deactivate the PS Vita system
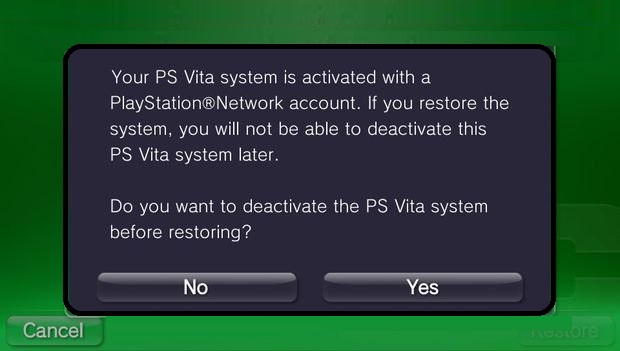
Important:- Note that you'll need to deactivate your Vita while logged into one PSN account to use it under another.
You’ll need to “restore” the PS Vita to sign on to the other account you want to use. This means that the data and settings will be wiped to factory standards, and that you’ll have to set up the system all over again. The good news here is that this process is very quick.
You probably won’t want to do this from a PC, as you’re only given one activation every six months! Deactivating from the Vita makes
It so that you can activate it again without issue to do this you’ll go to the Settings app, choose the PlayStation Network option, and then pick System Activation and follow the instructions.
or you can use this process also which can help you.
Or, you could start the Vita’s Restore process. The system should prompt you to deactivate the system first before restoring. It should also ask if you’d like to delete all data on the memory card. The whole process takes less than a minute.
3. Set up the Vita with your other PSN account.
It’s simply a matter of logging in with your other PSN account. Again, the setup process only takes a minute or two. You’ll set the language, date/time, and watch the silly mandatory opening movie. Then you’re good to go!
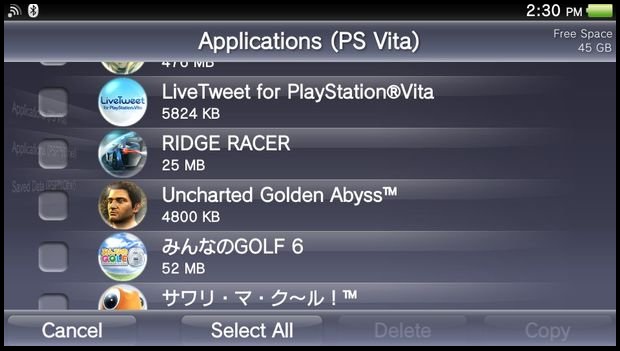
4. Reload save files and content.
Content Manager makes it easy to select everything you’d want back on your Vita. Note that you won’t be able to move over games that belong to another PSN account, but game saves and other data work just fine.
5. And when you want to go back to the first account, Restore.
Don’t even bother setting anything up. Just connect the same USB cable to the same PC/PS3 you used to back up.
Start the Content Manager, click Restore and watch as your Vita goes back to the way you had it before you logged in. You could even create backups of each PSN account on your PC/PS3 to have ready for easy switching.
It’s quite wonderful how easy it is to back up everything on the Vita.
